UN Wastewater Migration: Loading Cleanouts
Introduction
When many of us started receiving deprecation warnings for geometric networks from ESRI years ago, we shook our heads ruefully. Who has time to migrate? Not now! If you are like me, you have kicked the can down the road year after year, and now 2026 is here. As of March 1st, geometric networks are no longer officially supported, and we haven't migrated yet. If you are in the same boat, do not worry. In this blog series, we will take you step by step through our UN migration at the City of Grants Pass. You will share our suffering, learn from our mistakes, and by the end I hope you will feel new confidence for tackling this migration in your municipality.
This is the third post in our UN Wastewater Migration series.
- In the first post, we cover project setup, including installation of the untools package and downloading the Utility Network Foundation.
- In the second post, we introduce you to the Data Loading tools, and give you a brief tour of the DataReference sheet.
Today, we will configure the Data Loading mapping sheet for cleanout assets and import our first data into the target utility network! Spreadsheet-based configuration is the most arcane topic we will cover in these tutorials, so this post is probably the most challenging in the series. We are going to use the mapping sheet to map things and the lookup sheets to look stuff up, and by the end I hope you will feel confident loading your own assets into a utility network for your agency.
Contents
- Mapping Cleanouts
- Getting to Know the Mapping Sheet
- Using the Expression Column
- Using the TargetSchema Tab
- Using the SourceSchema Tab
- Using Domain Lookup Sheets
- Resolving Cleanout Connectivity
- Starting Over Again
- Referencing the Lookup Sheet
- Lifecycle and Construction Status
- Data Source Mapping
- Mapping Material
- Mapping Ownership
- Updating ocrs_clean
- Additional Cleanout Attributes
- Load Data Using Workspace
- Conclusion
Mapping Cleanouts
The first row on our DataReference sheet maps cleanouts in our geometric network into the SewerDevice layer of the utility network. We will begin the import process starting with this first row, and working our way down. Set the Enabled column value to TRUE for the first row, and FALSE for the remainder, so the Data Loading tools will ignore the other layers during loading. TargetDeleteQuery should already be set to 1=1, and PreserveGlobalIds to FALSE.

The spreadsheet in the MappingWorkbook column defines the mappings that the Data Loading tools will use to migrate features from the source layer to the target. We are going to click on this sheet in the cleanouts row, opening a new Excel sheet called "ssCleanOut-SewerDevice_Cleanout.xlsx" (see Figure 1) .
This sheet has several tabs: Info, Mapping, TargetSchema, SourceSchema and a series of tabs named after attribute fields in the source data. The Info tab contains links to documentation for the Data Loading tools and related folders in the workspace, as well as descriptions of validation errors. The Mapping tab defines the strategy for transforming source values into target values, and we will be doing the majority of our configuration work in the Mapping tab (see Figure 2) . The TargetSchema and SourceSchema tabs are primarily for reference, whereas the tabs named after attributes in your source data define Domain-specific value mappings.

Getting to Know The Mapping Sheet
The Mapping sheet has seven columns:
- TargetField: The name of the attribute field in the target utility network layer.
- FieldType: A description of the data type defined for the field.
- Expression: Specify either direct variable substitution or a Python expression to calculate the target value.
- LookupSheet: Use the specified sheet to map values by domain.
- LookupKeys: Name of the column containing domain values from the source layer.
- LookupValue: Name of the column containing domain values for the target layer.
- LookupDefault: A default value to use for the target layer if the source value does not have a specified mapping.
There will be a row in the sheet for each attribute field in the target layer, giving you an opportunity to specify the type of data you want imported into each field.
Using the Expression Column
The easiest, most straight-forward case is when you have an attribute in the target data that should be copied over exactly from the source, and this is what the Expression column allows you to do. Identify the import layer by enclosing the field name in exclamation points, the same syntax we use to refer to attribute fields in expressions for tools like Calculate Field. You can also click on the drop-down arrow and select from the list of source data fields. For instance, the first row contains the TargetField SHAPE, identified as FieldType Geometry, and it uses the Expression !Shape!, meaning that values from the Shape attribute in the source layer will be copied to the SHAPE field in the target.
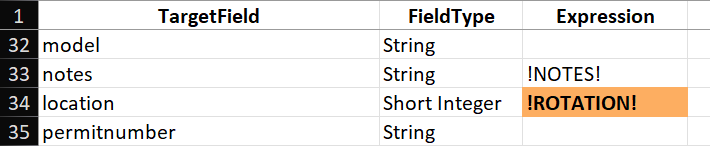
If you selected any of the Predictive Field Matching Options when you ran the Create Data Loading Workspace tool (either using Field Name Similarity, Domain Coded Value Description Similarity, or both), the loading tools will attempt to fill in the Mapping sheet for you. Poorly in my experience! For each case where the tools have automatically inserted a value, take a look to ensure that the variable mapping makes sense. For instance, the loading tools mapped the "depth" target field to !INTDEPTH! in the source layer, which would be perfect if any of my predecessors had bothered to populate this field. But given that I know all the values are Null, I can remove that mapping.
In other cases, the predictive algorithm came up with combos that were clearly incorrect, such as mapping the "location" field to !ROTATION!. In this case, the source and target schema do not even match: location is a short integer, and ROTATION is a double-precision float. When the schemas of the two layers do not match like this, the Mapping sheet is configured to display the cell in orange to draw attention to the mismatch (see Figure 3) . You will want to resolve discrepancies like this before attempting an import. In this case, I simply remove the mapping and leave the field blank, which will leave the target "location" field Null after import.
In our cleanouts layer, we use the following direct expression imports:
- SHAPE -> !Shape!
- GLOBALID -> !GlobalID!
- assetid -> !FACILITYID!
- diameter -> !ACCESSDIAM!
- notes -> !NOTES!
- surface_elevation -> !RIM!
- invert_elevation -> !OUT!
Using the TargetSchema Tab
For most target attributes, we can import the values from the source data, or leave the field empty. The exceptions to this rule are the ASSETGROUP and ASSETTYPE fields in the target utility network layer. The ASSETGROUP and ASSETTYPE fields are how Utility Networks handle subtyping, and they are based on coded integers. Every asset in the network needs to have valid values for its ASSETGROUP and ASSETTYPE codes, or it will not be able to connect with other assets in the network! We do not want to leave these fields blank, because without valid codes we will have nothing but connectivity errors. We also cannot use attribute values from our source data, because our geometric network does not have the same subtypes.
Figuring out the appropriate ASSETGROUP and ASSETTYPE for your source data requires exercising your careful professional judgement. We will use the TargetSchema tab to search through the available domain values for appropriate mapping targets.
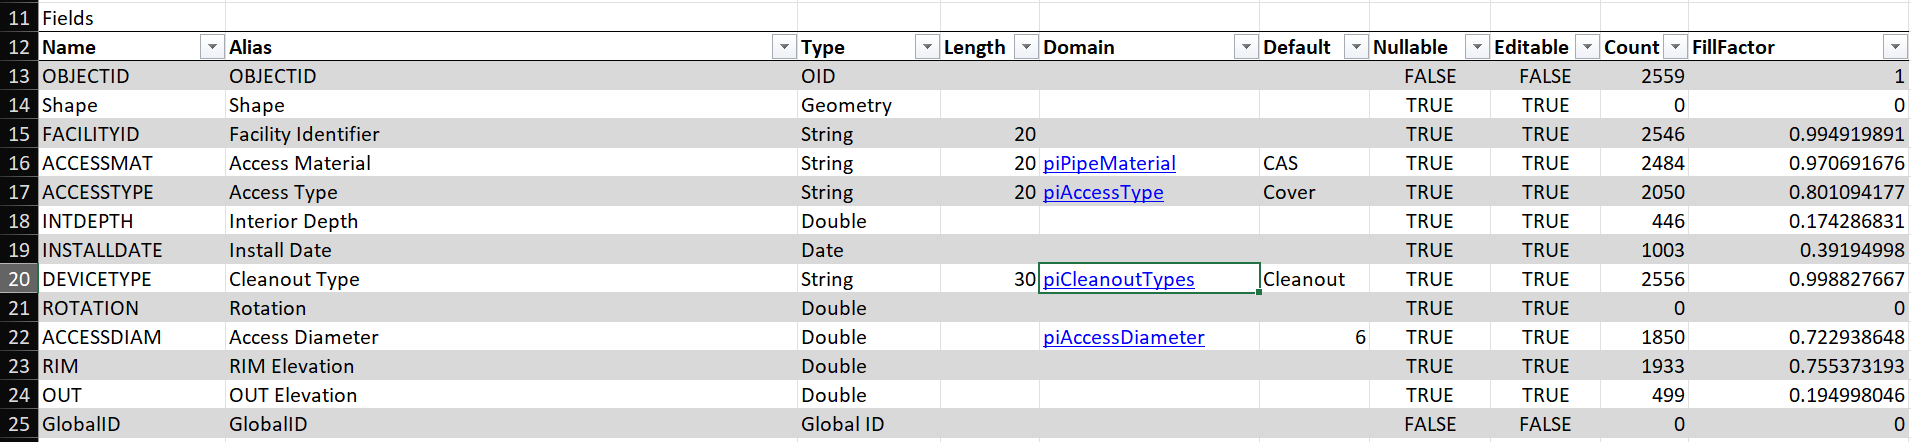
The TargetSchema tab contains comprehensive information about the domains for ASSETGROUP and ASSETTYPE in the target layer. The sheet contains several tables stacked vertically on the sheet, beginning with Properties, then Fields, Subtypes and SubtypeFieldInfos. The Properties table contains some generic descriptive information for the layer, and the Fields table shows a list of fields in the target data, along with links to their domain maps in the Domain column. The format of this table should be familiar from looking at the Fields pane in the Data Design menu of ArcPro.
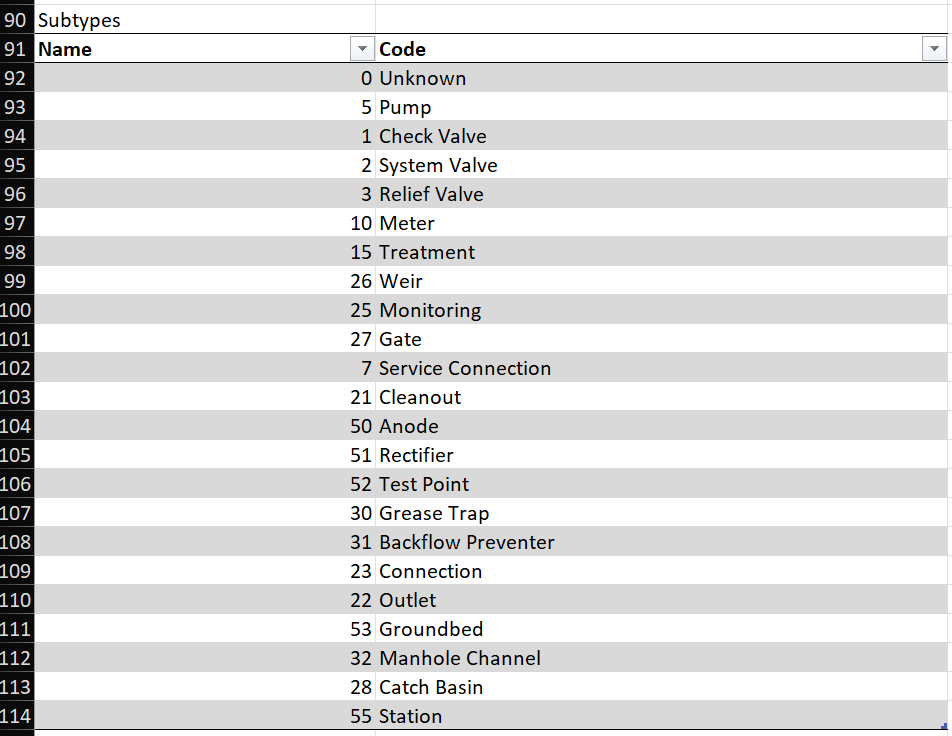
Scroll down to the Subtypes table, which shows the integer codes and descriptions for valid values of ASSETGROUP (see Figure 4) . In the case of cleanouts, the appropriate ASSETGROUP code is 21, based on the description "Cleanout". In the Expression column of the Mapping sheet, we can enter the number 21 for the ASSETGROUP row.
The SubtypeFieldInfos table includes field data for attributes that are specific to each subtype. Just like the Field table before, the column for Domain Name contains links to the domain for each type. Scrolling down to the rows for the Cleanout subtype, we can see that the ASSETTYPE attribute uses a Domain called Asset_Type_Sewer_Device_Cleanout (see Figure 5) .

Clicking on this doc link will open the domain mapping sheet for working_ap.gdb, from the Domains folder in the Data Loading Workspace. The linked table shows the coded domain values associated with the Cleanout subtype of ASSETGROUP (see Figure 6) .
Using the SourceSchema Tab
The SourceSchema sheet is simpler in the case of Grants Pass, because our geometric network does not use subtypes. Therefore, this sheet only has tables for Properties and Fields, omitting the tables for Subtypes and SubtypeFieldInfos. In the Domain column of the Fields table, we can see that the source layer for our cleanouts uses a domain called "piCleanoutTypes" assigned to the DEVICETYPE field (see Figure 7) .
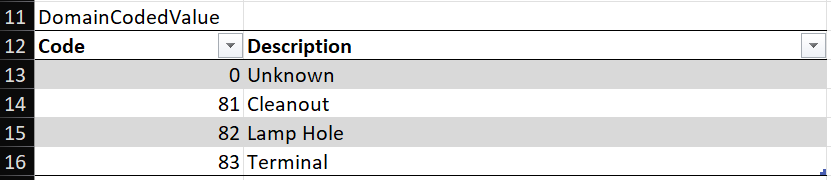
Just as in the TargetSchema sheet, this row contains a doc link to the coded domain value for "piCleanoutTypes", this time pointing to the sheet for wastewater_gn.gdb in the Domains folder of the Data Loading Workspace. If you follow this doc link, you will see the Domain definition for "piCleanoutTypes" (see Figure 8) .
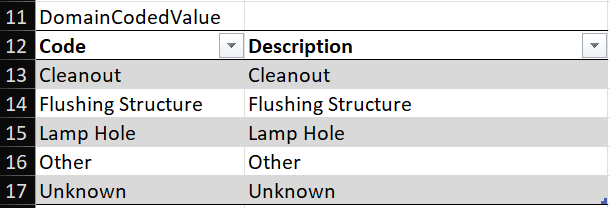
Comparing the source and target domains, they share fields for Cleanout and Lamp Hole. The source layer includes a category for Flushing Structure, and the target layer includes a category called Terminal. In the Grants Pass wastewater dataset, we do not have any cleanouts designated as Flushing Structures, so the only two categories in use have direct parallels in the new domain:
- Cleanout -> 81: Cleanout
- Lamp Hole -> 82: Lamp Hole
However, this creates a quandary, because the target value assigned to the feature depends on the domain in the source. We cannot use the Expression column in the Mapping sheet, because that would map all cleanouts to a single value. Instead we will use the Lookup columns to map source values to target values based on the source domain.
Using Domain Lookup Sheets
When we need to map domain values from the source data into specific values of a different domain in the target data, we use the LookupSheet column in the Mapping sheet to specify which tab contains the domain-based mapping. For the cleanouts layer, the attribute field that holds the domain value in the source data is DEVICETYPE, and we have a corresponding tab called DEVICETYPE that contains the lookup table for these domain values.
If you elected to use predictive matching during workspace creation, the Data Loading tools may have taken a crack at setting up these mappings for you. In the case of DEVICETYPE, the automated result is pretty good, identifying the same mapping for domain values that we identified above (see Figure 9) .

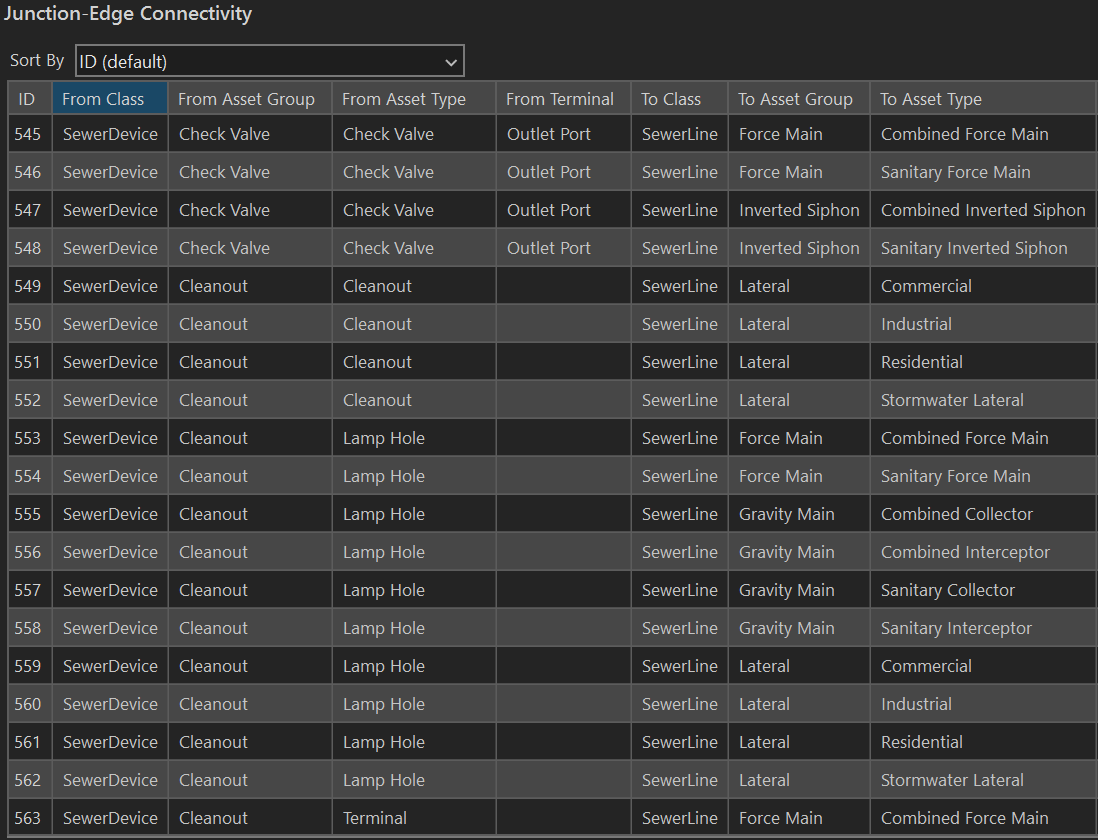
In the Properties pane of the Utility Network layer, the Attribute Rules define what can connect to what. Inspecting the Cleanout domain in the Junction-Edge Connectivity rules, we see that the Cleanout subtype can connect to Lateral service lines, whereas the Lamp Hole subtype can connect to Gravity Mains, Force Mains or Lateral service lines (see Figure 10) .
Resolving Cleanout Connectivity
I am not an expert in wastewater management. I do not know the differences between a Cleanout, a Lamp Hole, and a Terminal. However, I can tell you that the way our source data is categorized will generate tons of connectivity errors if I use the recommended (logical) mapping. The reason is that most of the cleanouts along our gravity mains are classified as the Cleanout subtype, which cannot connect to the Gravity Main type in the target layer. There are two strategies to resolve this discrepancy. First, I could simply change the mapping, so assets designated Cleanout in the source data get mapped to the Lamp Hole type. Everything is a Lamp Hole. This works, but it homogenizes our data, and we lose some of the expressiveness that we gain using subtypes to describe behavior. The problem is that the data is our source layer is not configured correctly for import, so the second approach is to correct the data in the source layer.
We could also change the Attribute Rules for the Cleanout subtype in the utility network, adding rules to allow connections with main lines. However, I am reluctant to add new rules, because it is the strictness of the connectivity rules in the network that protects us from creating invalid configurations. If we just allow everything to connect to everything else, we begin to lose the cloak of type safety that we have spread over the network. Instead, it appears that our source data has been incorrectly categorized. When I examine the cleanouts in our source data, virtually every cleanout has the type "Cleanout" assigned to it, with almost no uses of the other subtypes.
To resolve this issue, I need to adjust the source data such that it will sort itself into the correct categories on import. In this case, I Select by Location (in ArcMap) all the cleanouts that are attached to gravity mains, and change the cleanout type from "Cleanout" to "Lamp Hole" using the Calculate Field tool, affecting 953 out of 2,259 assets. Then I repeated this process for cleanouts attached to force mains, affecting another ten assets. Now, cleanouts in the source data attached to mains will map to the Lamp Hole subtype, and cleanouts attached to service laterals will map to the Cleanout subtype, using the existing mapping.
Starting Over Again
Since I have altered the source data, I have to re-import the source data from the Enterprise database into the local GDB, transforming the projection and including the domains and Global IDs. This is just the first of many times I will go through this loop, discovering aspects of the source data that need to be changed or updated to enable import into the Utility Network, making those changes, and exporting it again to the local GDB. You do not need to rerun the Create Data Loading Workspace tool if you are using existing variants of domains in your source data. If you add variants, you will need to either recreate the Data Loading Workspace, or manually add those variants to the lookup table. In this case, since we are using existing variants, the Data Loading Workspace requires no changes.
Why did I alter the source data on our Enterprise database? Didn't I make a local copy to avoid having to do that? Remember that this is a side project for me, during my normal work day I am adding new development and tweaking assets on the map in response to notes from field crews. The local copy is likely to become out-of-date almost immediately. Since I will need to pull a fresh copy from the database to capture these changes, I would lose all the changes to the cleanout types if I only made those changes on the local copy, and would have to repeat the process again. In this case, changing the type from Cleanout to Lamp Hole in the source data does not break any workflows or map symbology, so it is a harmless change.
My goal for the import process is to streamline the steps so that we can get a clean import of the source data with minimal manual adjustments required to resolve connectivity errors. By adjusting the domain values in the source data for cleanouts, we enable a clean import, with no manual adjustments required after the fact to correct the assigned subtypes - the import "just works".
To recap:
- We need to assign different integer codes to the ASSETTYPE field based on the domain values of the DEVICETYPE field in our source data.
- The DEVICETYPE tab contains a lookup table mapping domain values from the source data to domain values in the target utility network.
- We adjusted domain values in the source data so they will resolve to the correct value in the target domain.
So how do we get the Data Loading tools to read from the this lookup table during import?
Referencing the Lookup Sheet
To tell the Data Loading tools to refer to the lookup sheet, we need to point to this sheet on the Mapping tab in the row for ASSETTYPE. The LookupSheet column needs to contain the tab name of the lookup table, in this case DEVICETYPE. Even though the lookup sheet contains description columns, the loading tools will only use two columns from this sheet: 1) the DEVICETYPE column that identifies domain values in the source dataset, and 2) the Asset_Type_Sewer_Device_Cleanout column that identifies domain values in the target dataset. Mapping from source to target values happens row by row, so assets that match the Cleanout domain value in cell A2 will map to the short integer 81 in cell C2 (see the previous figure).
You specify which columns to use for the source and target domains using the LookupKeys column to identify the source column and the LookupValue column for the target column. For the ASSETTYPE row, we use the following configuration (see Figure 11) :
- Expression: Must be blank if Lookup Sheet is used.
- Lookup Sheet: DEVICETYPE - Identifies the sheet with the lookup table.
- Lookup Keys: DEVICETYPE - Identifies the column DEVICETYPE in the sheet DEVICETYPE.
- Lookup Values: Asset_Type_Sewer_Device_Cleanout - Identifies the column Asset_Type_Sewer_Device_Cleanout in the sheet DEVICETYPE.

Lifecycle and Construction Status
In Grants Pass, the domain we use to track the life-cycle of our assets (AssetStatus_2019) is a mixture of indicators for both life-cycle and construction. Consequently, we will use this domain to map source values to attributes for life-cycle and construction status in the destination layer. Using the same techniques discussed for ASSETTYPE, we are going to use the lookup sheet for AssetStatus_2019 to specify mappings for the lifecyclestatus and constructionstatus attributes (see Figure 12) .

Remember that you can look up the target schema to determine what short integer codes are valid for the target attribute.
For the lifecyclestatus and constructionstatus rows in the Mapping sheet, we use the following configuration (see Figure 13) :
- lifecyclestatus
- Lookup Sheet: AssetStatus_2019 - Identifies the sheet with the lookup table.
- Lookup Keys: AssetStatus_2019 - Identifies the column AssetStatus_2019 in the sheet AssetStatus_2019.
- Lookup Values: Lifecycle_Status - Identifies the column Lifecycle_Status in the sheet AssetStatus_2019
- constructionstatus
- Lookup Sheet: AssetStatus_2019 - Identifies the sheet with the lookup table.
- Lookup Keys: AssetStatus_2019 - Identifies the column AssetStatus_2019 in the sheet AssetStatus_2019.
- Lookup Values: Construction - Identifies the column Construction in the sheet AssetStatus_2019.

Data Source Mapping
The predecessors in my position loved the DataSource attribute. On top of the base domain definition of DataSource from the Local Government template, they added more than a dozen categories of debatable utility, such as "CAD As Built" vs. "GeoReffed CAD". We have categories with z's in front of them, and without, so "zField Worker" and "Field Worker" are both available options. To top it all off, we use this field for NOTHING. All the effort put into developing this attribute field was for naught. We neither need it nor use it.
Therefore, I have determined to put as little energy into mapping this attribute from source to target as possible, because we probably won't use datasource in the new Utility Network either. We will use the lookup sheet DataSource to map domain values from the source to whatever default categories happen to be available in the target domain (see Figure 14) . Remember we can use the TargetSchema tab to find a description of the target domain for the spatialsource attribute in the Utility Network.
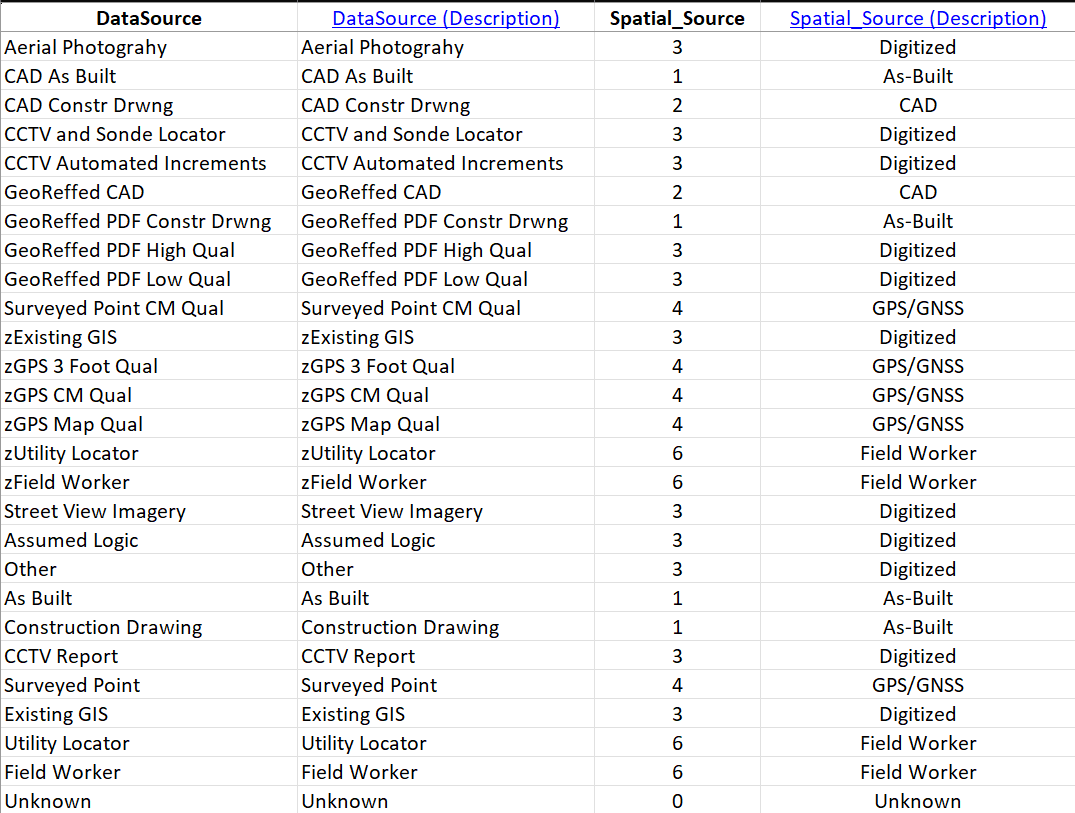
For the spatialsource row in the Mapping sheet, we use the following configuration (see Figure 15) :
- Lookup Sheet: DataSource - Identifies the sheet with the lookup table.
- Lookup Keys: DataSource - Identifies the column DataSource in the sheet DataSource.
- Lookup Values: Spatial_Source - Identifies the column Spatial_Source in the sheet DataSource.

Mapping Material
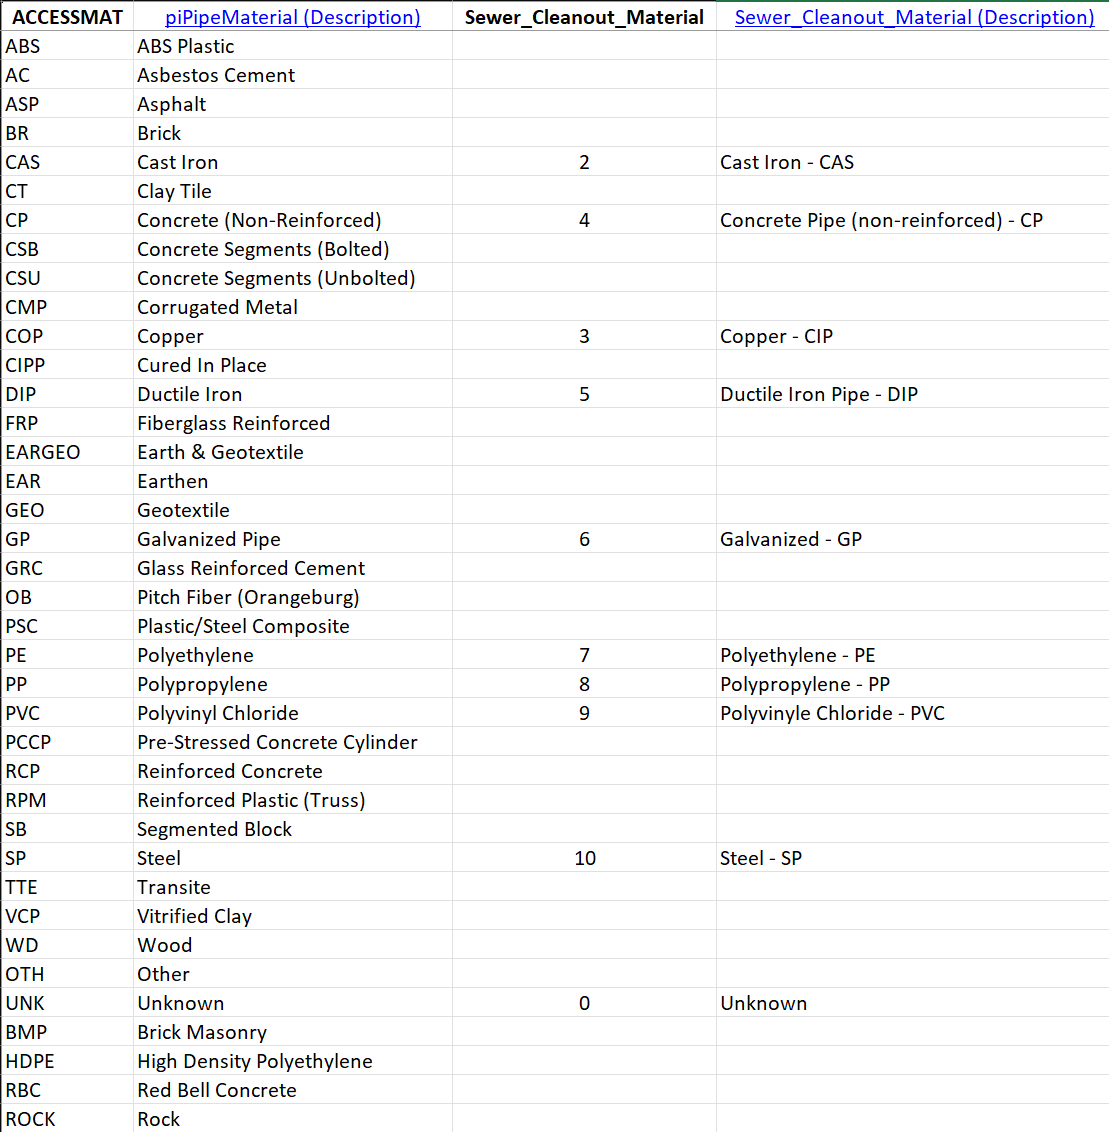
After throwing the predictive matching tools some hard shade in this article, I should point out that it worked perfectly on the ACCESSMAT field of our source data. This field uses a domain called "piPipeMaterial". We use this domain for water, storm and sewer assets, so it includes variants that are not applicable to wastewater. In contrast, our target domain is called "Sewer_Cleanout_Material" and only includes types for this specific asset. The predictive matching tools identified the material types that match the target values, and assigned the correct short integer codes to the lookup table (see Figure 16) .
For the material row in the Mapping sheet, we use the following configuration (see Figure 17) :
- Lookup Sheet: ACCESSMAT - Identifies the sheet with the lookup table.
- Lookup Keys: ACCESSMAT - Identifies the ACCESSMAT column in the sheet ACCESSMAT.
- Lookup Values: Sewer_Cleanout_Material - Identifies the Sewer_Cleanout_Material column in the sheet ACCESSMAT.

Mapping Ownership
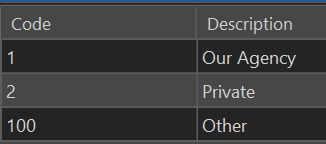
The ownedby attribute in the target Utility Network has the opposite problem of the spatialsource field, the categories in the source domain are widely used, and the categories in the target layer are not detailed enough. The ownedby field uses the Sewer_Asset_Owner domain, which consists of only three values (see Figure 18) :
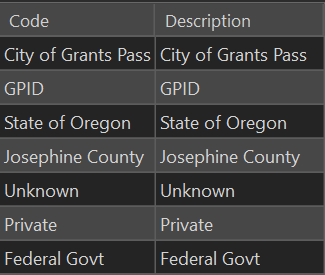
Our ownership field, AssetOwner_2019, specifies seven unique values (see Figure 19) , including our partner government agencies, and we use them. Field crews regularly assess agency ownership to determine maintenance responsibility, and inform inter-agency cooperation, so it is important to preserve these domain values when importing them into the new network.
To make these domain values available in our target network, we have to add them to Sewer_Owner domain. Since this will need to happen every time we import the data, we want to make this change on our clean original copy (ocrs_clean).
Updating ocrs_clean
In the Catalog Pane, right-click on a layer in the ocrs_clean asset package, and select Domains from the Data Design drop-down. Adjust the domain definition for Sewer_Asset_Owner so the assigned integer codes map to the desired agency list (see Figure 20) .

When we update ocrs_clean, we also need to make a fresh copy of working_ap to use for the messy process of importing. If you are working with layers in working_ap in the active map, you may need to exit ArcPro to release the lock on the database, so you can copy over it in File Explorer.
Once the working_ap has been updated with the new domain, you have two options: 1) Run Create Data Loading Workspace again to update the TargetSchema page with the new domain knowledge. 2) Update the lookup sheet for ownedby manually, just as you updated the domain for ownedby in the asset package, leaving the TargetSchema sheet unchanged.
If you elect to regenerate the Data Loading Workspace, be aware that it will overwrite your existing workspace folder. You can rename the old folder, if you want to reference or copy over work you have already done. You can also rename the workspace folder in the parameter dialog for the Create Data Loading Workspace tool. Even with the updated domain, predictive matching failed to identify the correct target values for this attribute, so I ended up filling out the lookup table manually anyway (see Figure 21) .
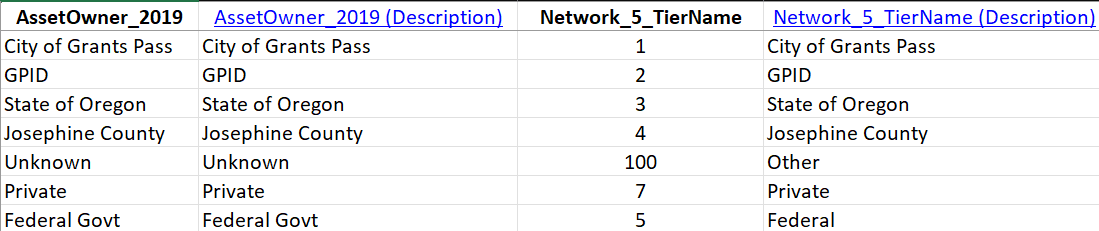
For the ownedby row in the Mapping sheet, we use the following configuration (see Figure 22) . You can blame predictive matching for the clunky column name "Network_5_TierName".
- Lookup Sheet: AssetOwner_2019 - Identifies the sheet with the lookup table.
- Lookup Keys: AssetOwner_2019 - Identifies the column AssetOwner_2019 in the sheet AssetOwner_2019.
- Lookup Values: Network_5_TierName - Identifies the column Network_5_TierName in the sheet AssetOwner_2019.

Additional Cleanout Attributes
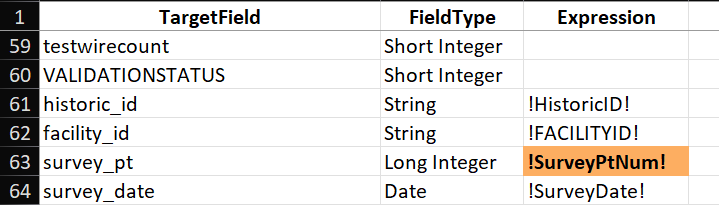
We have some attribute fields in our source data that do not have corresponding attributes in the target layer, but we still want to carry these fields forward into the new network. These fields are:
- facility_id: IDs assigned to assets when we adopted the Local Government ESRI template in 2019.
- historic_id: IDs assigned to assets prior to adopting the Local Government ESRI template.
- survey_pt: Unique identifier (integer) for survey points.
- survey_date: Date of collection for survey_pt.
Although we no longer use historic_id or survey_pt actively, we have many older records that reference these IDs, so we need to keep them for backwards compatibility. We currently use facility_id, and indeed I started this migration by copying facility_id into the assetid field. However, our Facility IDs have some problems. Although we used attribute assistant to generate unique values for our IDs, one of the less technically savvy members of our staff would manually add IDs to the sequence, something the assistant did not handle gracefully. We ended up with large gaps in our numbering, and now we are generating IDs like "WDMR-100718" when the asset count is only 13,899, a pattern repeated across many types of assets. We will to keep these IDs for future reference, but I will be using new IDs in the assetid field, so we need to keep the original values in the facility_id field.
Similar to the ownedby domain, the problem here is that these fields are not present in our target asset package. We need to add these fields to the SewerDevice layer in the asset package, and because we will need these attributes every time we import, it means we need to update ocrs_clean. After adding these four fields to the SewerDevice layer in the ocrs_clean asset package, I make a fresh copy of working_ap. At this point, if you run Create Data Workspace again, the sheet for cleanouts will include the four added fields at the bottom of the TargetField column in the Mapping sheet. If you do not want to copy over or redo all the work you have done on the workspace Excel sheets, you can manually add the new field names to the TargetField column (see Figure 23) .
Load Data Using Workspace
Observant readers will note that I have adjusted ocrs_clean and made a fresh copy of working_ap twice without doing any actual data loading. In fact, I only discovered these issues initially after loading and inspecting the data. Every time I made a change to ocrs_clean, and recopied working_ap, I was wiping out quite a bit of work. Often, you will need to load and explore your data to discover what changes are necessary in your source data or target asset package. This process can be frustrating, but it is how we will arrive at a fast and clean import, so your efforts will not be in vain. Since these tutorials are already running on the long side, I have spared you some of my false starts, but now it is time to explore the loading process using the Load Data Using Workspace tool.
The Load Data Using Workspace tool only has a single parameter, where you will select the DataReference sheet we have been working on for the past couple tutorials (see Figure 24) . Press the Run button to start the data loading process.

Use the View Details button to open the details pane and assess the progress of the tool. Note that our tool completely successfully... with warnings. Looking more closely, the warnings specify that all 2,556 rows of data failed to import (see Figure 25) . That's a pretty significant warning! If we inspect our target dataset... it is still empty.
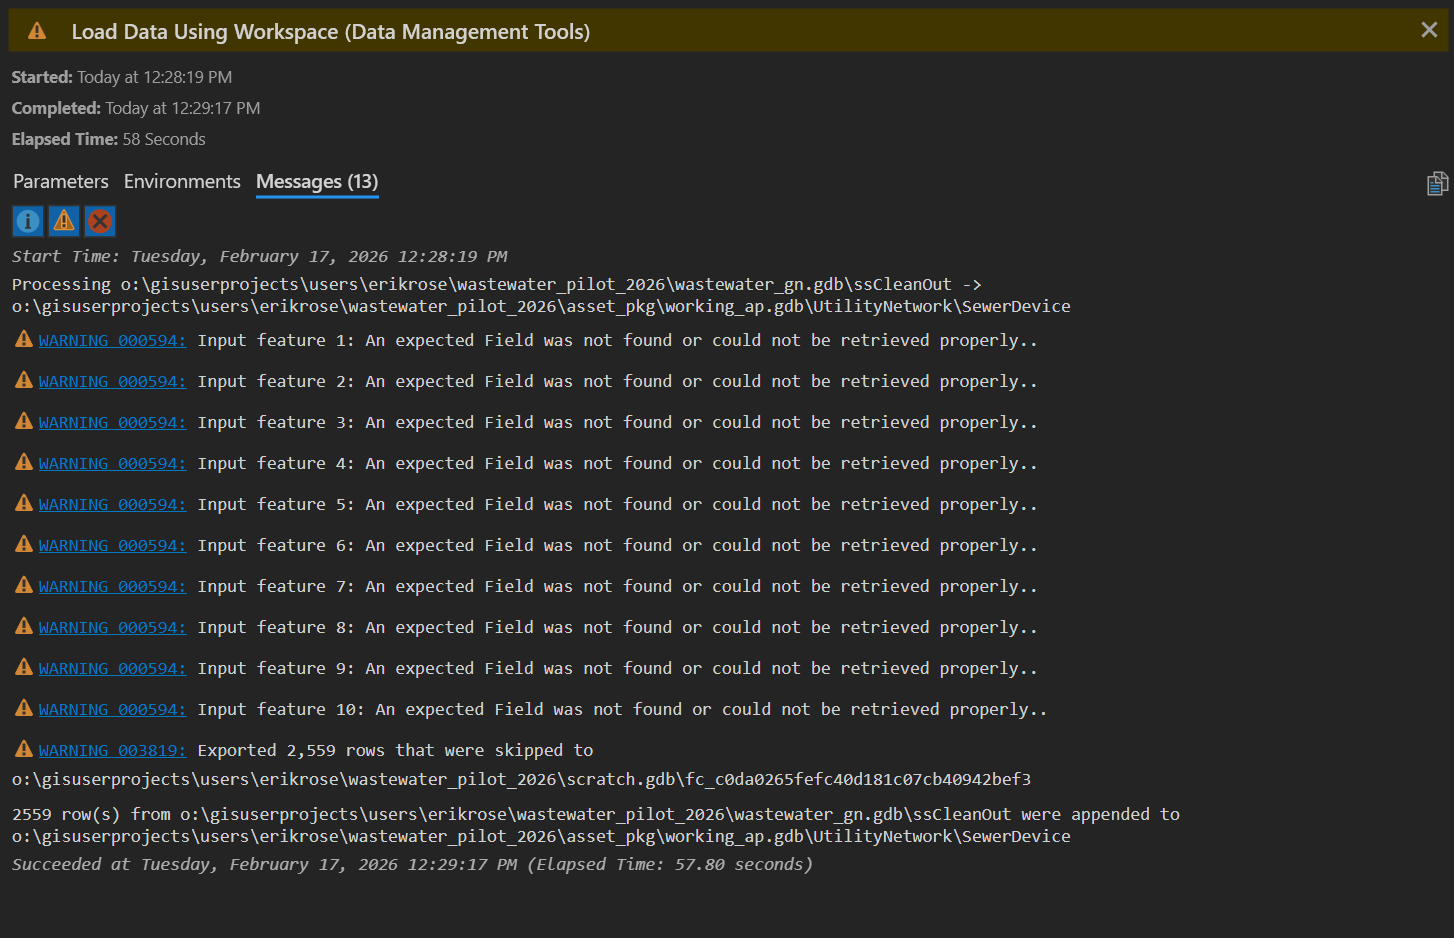
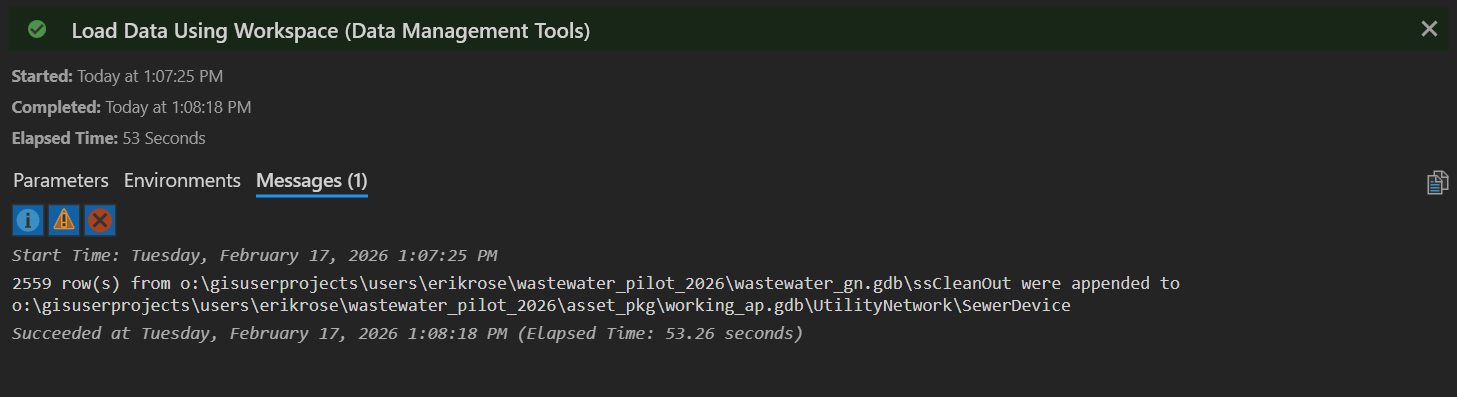
So what went wrong? A naive technician might look up Warning 000594, but this will only deepen the mystery: "An input feature being processed is positioned outside of the current Output XY Domain environment." In fact, the problem is in the PreserveGlobalIds column. As I alluded to earlier, I want to keep the GlobalIDs from the my source data, so I naively set PreserveGlobalIds to TRUE. Setting it to TRUE is causing the import to fail. Why? I don't know! But if we set it to FALSE, the import will succeed, and because we explicitly map GlobalID in the source data to the globalid attribute in the target dataset, all IDs are successfully transferred during the import anyway.
Conclusion
We have successfully loaded our first asset type into a Utility Network! You have learned how to customize attribute values in the target network by using the Expression column for direct values, and how to use lookup tables to map values by domain. I have shown you the mappings we use here in Grants Pass to import our cleanout assets, and gone into some detail on why we use each mapping. I hope this helps you identify the correct techniques for importing your own data. In the next article, we will look at import mappings for more asset types, and leverage some custom Python functions to streamline the import process.
If you have questions, advice or war stories of your own, I hope to hear from you. Drop me a line at erose@grantspassoregon.gov. And stay tuned!